Quest ADB Scripts
A downloadable tool for Windows
Quas - QUest ADB Scripts
Utility - a collection of the most commonly used commands and actions for the headset. It's like a "multitool" for beginners and beyond. No need to search for and learn adb commands, parameters, and so on.
Just select the desired action from the list.
Description of Operation and Functional Capabilities of the Program
Description of Operation:
The Quas program is designed to help solve problems with Meta Quest headsets, as well as to simplify the use of many standard commands and actions, both documented and not so much. In fact, it is a multitool, a Swiss army knife for enthusiasts and owners of Quest headsets.
The program is written in cmd with some inserts of scripts from other languages: JS, VSH, VBS, PS, as well as with many separate PowerShell scripts, in particular for displaying graphical windows.
Packed in an exe file using Quick Batch File Compiler. It contains additional tools: fastboot, scrcpy, devcon, 7z, adb, aapt, etc. A full list of content can be found on Github.
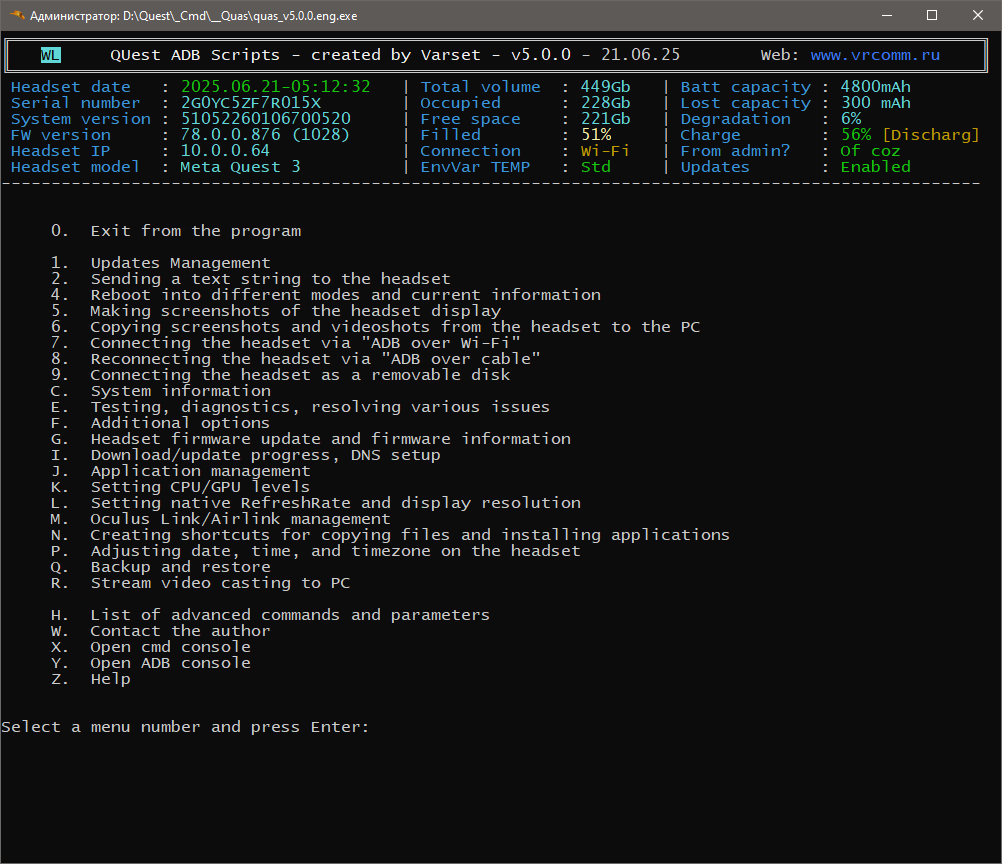
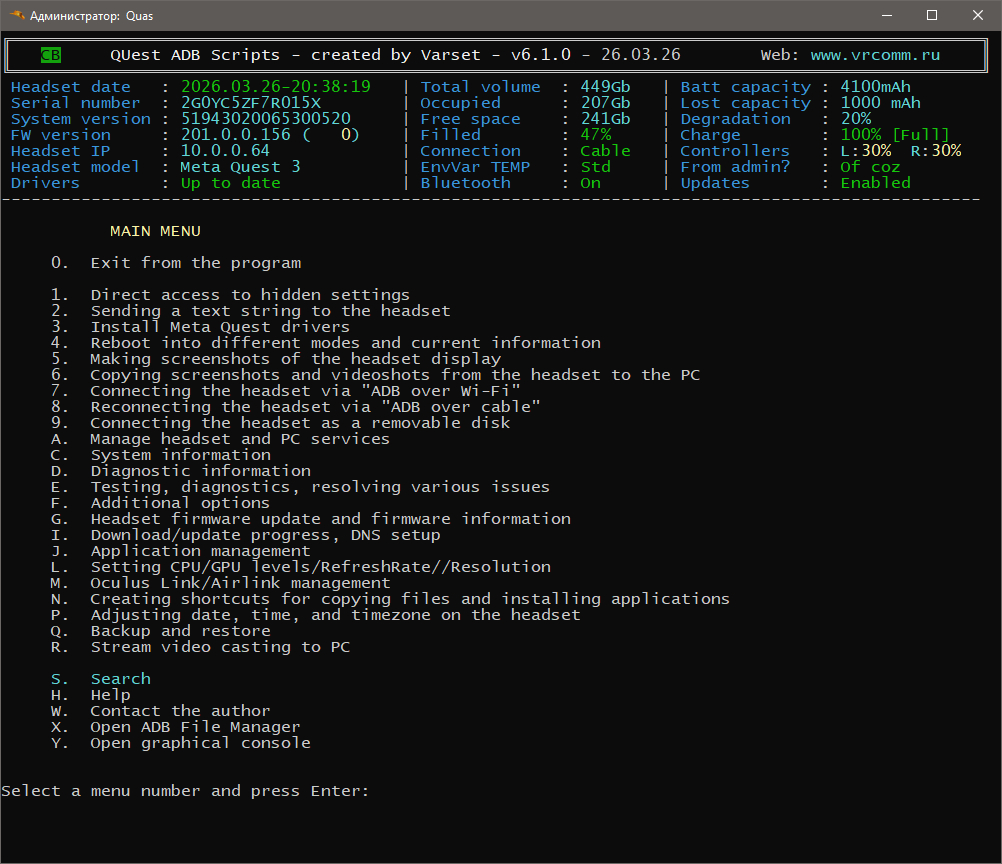
The program does not need to be installed, just unpack the downloaded archive with applications for working with WinRAR, 7z or other archives, run quas.v.X.X.X.exe for the selected language, wait a few seconds and you can use it. You can also use some startup keys and parameters (see the built-in help, point H, or the list of additional commands at the end of this description). At each launch, Quas displays a table with the most important data on the Main Screen.
The principle of working with the program is very simple: select a menu item and then follow either the prompts or select the next item. Many options contain detailed instructions and explanations.
In addition to the main data, the information table contains color markings for the most important parameters:
- Date in the headset: The correct time will be highlighted in green, and the wrong time will be highlighted in red.
- Filling: If the headset is 90% or higher full, the value will be red,50% or higher yellow. Below that, it's green.
- Connection: Cable -green, Wi-Fi- dark yellow, dual connection- red.
- TEMP variable: Standard - green, non - standard - yellow.
- Battery level: Below 15% - red, below 50% - yellow, all that is higher - green.
- Launch with permissions: On behalf of the admin - green, on behalf of the user - yellow.
- Update status: Enabled - green, disabled - yellow.
- Headset charge status: Charging - dark green, Full - green, Discharge - Dark yellow, No charge - Red.
- Controller charge:Below 15% - red, below 50% - yellow, all that is higher - green.
- Drivers: Current – green, Outdated – yellow.
- Bluetooth: On – Green, Off - Yellow.
All colors are selected according to the following logic:
Green: regular and optimal status
Dark yellow: you may need to pay attention in one case or another
Yellow: something to look out for
Red: be sure to pay attention
The program has built-in color (only for Win 10 and higher) and letter markings indicating the mode or status of the headset.
It is displayed in the upper-left corner of the program and it is convenient to use it with parameter b (Bypass Info Table key) when the information table is hidden to speed up the program launch.
There are three more registry keys in the program. You can read their description below in the section Additional options-Manage registry keys for launching the app.
List of indicators and what they mean:
- NA - Not Available - Device not connected
- DR - No Drivers - headset connected, but drivers not installed
- CB- Cable - Device connected via cable
- DB - Doublc connection - Double connection, via cable and Wi-Fi
- WL - Wireless connection - connected via Wi-Fi
- DV - No Developer - Developer mode not enabled
- AU - No Authentication - headset not authenticated
- SL - Sideload mode - headset in Sideloader mode
- BL - Bootloader mode - headset in Bootloader mode
- NS - Not Support - Connected device is not a headset.
- NO - No checks – All initial checks are disabled.
- EM - EDL Mode – The device is in Emergency Download Mode.
- OF - Power Off – The device is turned off.
- DG - Diag mode - The headset in Diagnostic mode
- MT - MTP mode - The headset is in MTP mode and may not be available via ADB
Selection of applications for backup, disabling, launching, etc. is carried out through the graphical interface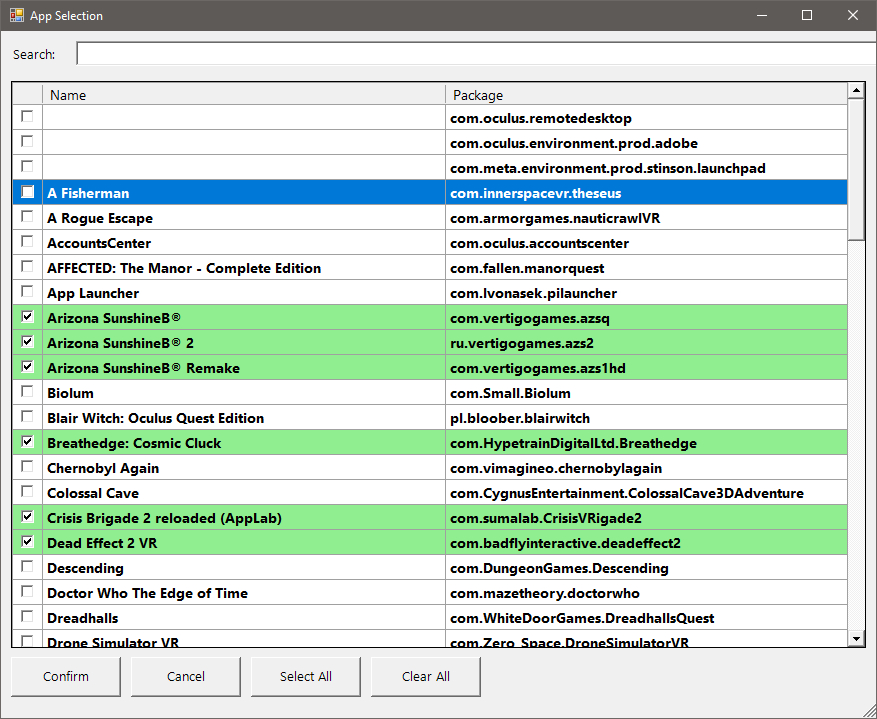
Functionality and list of options:
- Direct access to Android settings: Allows you to directly access hidden Android settings:
- General Settings
- System
- For developers
- VPN Settings
- Adding a Wi-Fi network
- Date and time
- Memory usage by apps
- Bluetooth
- Data saving mode
- Save battery power
- Location
- All apps 1
- All apps 2
- Notifications
- Confidentiality
- Protection and privacy
- Storage
- Sending a line of text to the headset: Sending any text from the PC to the input field on the headset, such as the address in the browser, the key to the NVR client or login / password in the appropriate fields.
- Installing Meta Quest drivers: Automatically install and download drivers of various versions.
- Reloading to different modes and information about the current one: Reboot modes:
- Resuming headset loading from Bootloader mode
- Standard / standard headset reset.
- Reloading the headset to Bootloader mode
- In Bootloader mode, the following functions are available:
- Collecting and displaying information that includes:
- Status and status of loading slots
- Headset revision number
- Headset Model
- Current headset firmware version
- Version of the headset environment
- Battery level
- Control of all headset sensors:
- Disabling sensors
- Enabling sensors
- Collecting and displaying information that includes:
- In Bootloader mode, the following functions are available:
- Reloading the headset to Recovery mode
- Reloading the headset to Fastboot mode
- Reloading the headset to Sideload mode (normal option)
- Reloading the headset to Sideload mode (alternative option)
- Determine the current headset mode
- Turn off your headset
Illustration of displaying information about the headset in Bootloader mode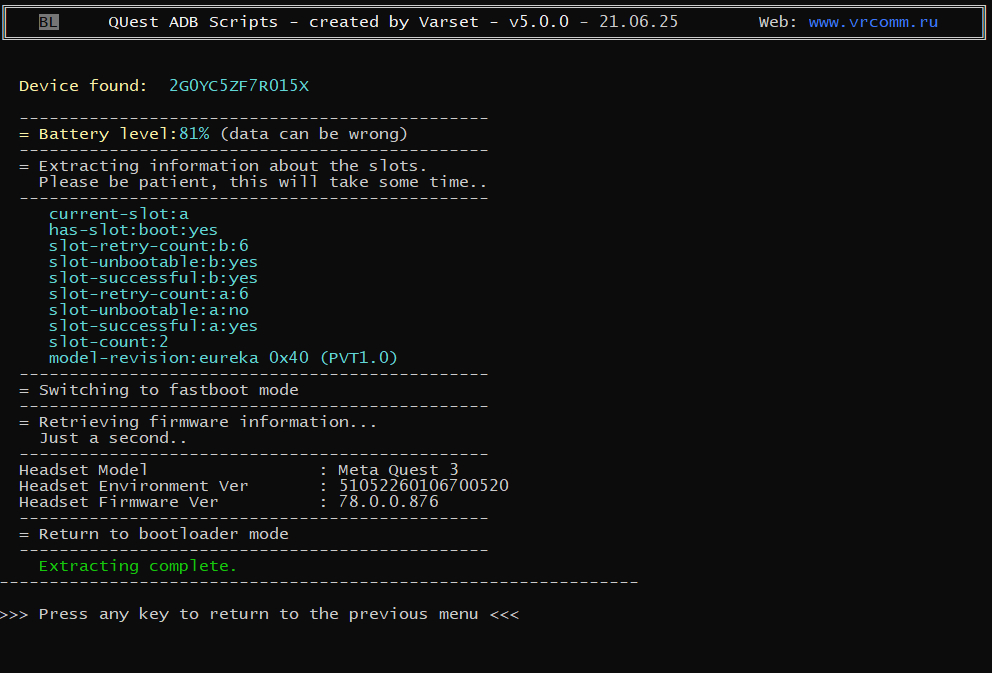
Information about the firmware, etc., will allow you to find out the current status of the headset. Disabling sensors can help you load into the environment if the headset doesn't load because the sensors or their services fail. If disconnection fails, a message about this will be displayed.
- Creating screenshots of the headset display: Create screenshots of your headset in three different ways:
- Single
- A series of screenshots (each screenshot at the touch of a key)
- Automatic, with a certain interval. You can set the interval between screenshots manually.
Screenshots are copied to the Desktop of the PC in the Screenshots directory
- Copying screenshots from your headset to your PC: Copy all available screenshots and video shots on your PC to the Quest Media folder on your Desktop. If there is no such folder, it will be created. Two directories will also be created inside it: Screenshots and Videoshots.
- Connecting the "ADB headset via Wi-Fi": In this mode, you can use ADB commands or the same Quas without using a USB cable. This option only works until a reboot or while the process is running on the PCadb.exe. It contains two types of connection: via the standard port 5555 and via the TLS encryption protocol.
- Reconnecting the "ADB via cable" headset: Switch to using ADB via cable, for example, for copying large files.
- Connecting your headset as a removable disk: In some cases, the PC does not connect the headset as a removable disk. This option allows you to force this issue to be resolved.
- Manage headset and PC services: Enable and disable various services, as well as view their status. List of managed services in this menu:
- Managing updates
- Wi-Fi control on the headset
- Managing the Security system
- Proximity sensor control
- Bluetooth control on the headset
- Headset-mounted Flight Mode control
- Managing ADB Wi-Fi over TLS (Debugging over Wi-Fi)
- Managing Device Storage Monitor
- Parameter Management GPU Scheduling, Hardware Acceleration, and Game Mode
- Restarting the ADB server on the PC
- System Information:
- Working with dumpsys: saving a full dump or a list of services, searching through the dump.
- Memory analyzer. Options for checking and diagnosing the memory used by applications. Contains the following items:
- Total memory usage. Shows summary data about the state of the device's RAM: the total amount of RAM, how much is used, and how much is free. This option is useful for quick assessment of system load.
- Memory usage by application. Displays a list of processes and applications with the amount of memory they use. It is possible to display only system processes or only user processes, and display a list of the most "heavy" applications. It is used to search for "voracious" processes and analyze who exactly loads the device.
Memory Info Illustration Collection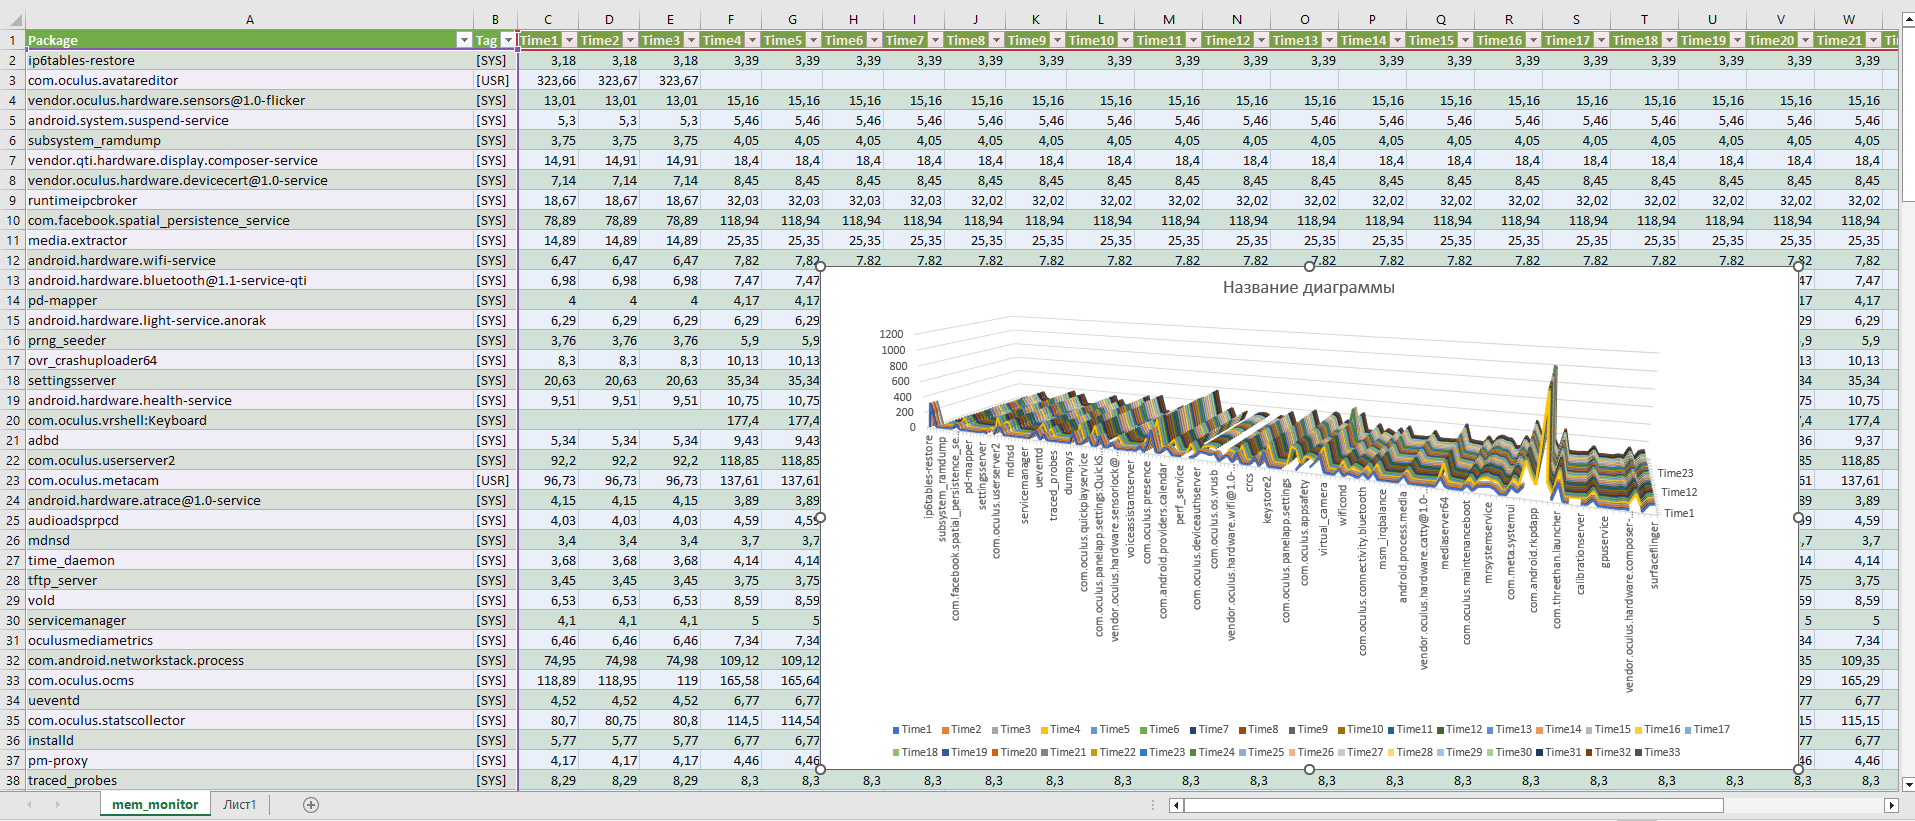
- Real-time memory monitoring (with parameter requests)
- Real-time memory monitoring (with auto parameters). Options monitor memory usage by applications. At the same time, they write data to a CSV file for further analysis, display memory dynamics in the console, and allow you to set the update interval and the number of snapshots. They are used to track memory changes and search for leaks.
- Save all headset properties to a file (getprop)
- Show the headset's IP address: Display the current IP address of the headset
- Save a list of installed packages (packages names): It is saved in short and full format to text files.
- Show the headset's serial number: Shows the headset's serial number
- Headset system settings (setting list system/global/security): Saves each section to a text file
- Working with Logcat: Logcat saving for the selected time or volume can be set manually. There is a built-in Logcat search during log collection.
- Battery Information: Displays the remaining, lost, studied, estimated and regular capacity. Shows the battery degradation rate, status, and health. Saves additional data to a file.
- List of running Apps: Displays and saves lists of running user or system apps
- Extracting a bugreport: Retrieves a bug report
- Viewing CPU-intensive applications: Displays a list of the most resource-intensive applications
- List of files/directories and their volume: Displays a list of available files and directories with their size.
- Show the amount of space used: Shows the total amount of memory, as well as how much is occupied, free, and the percentage of full volume.
- Log of USB device connections and disconnections: Saves Windows events for disconnecting and connecting the USB cable to a file with the date and time of events. Used to diagnose the problem of disconnecting the headset from the PC.
- Controller Information: Displays information about each controller: Firmware version, Battery Level, General Status, Position Tracking, IR Diode level.
- Save all system information in bulk to a single archive: Save complete information about the headset - system, global, security, bugreport, dumpsys, etc.
- Diagnostic information. It is designed to collect and send information about the headset and PC to help you analyze problems. Includes the following items:
- Summary of diagnostic information. Brief but most important information.
- Information about all your computer's devices. All information about the hardware that is displayed in the Device Manager. The following data is collected:
- Name of the device,
- Hidden or not,
- Drivers installed or not,
- VID, PID,
- Manufacturer,
- Hardware IDs
- Information about non-installed computer devices. Information only about devices that don't have drivers installed
- Information only about Quest headsets.
- Collect and send comprehensive information. Collects and sends summary information about the headset as well.
- Send any file for diagnostics. Easy and convenient sending of any file for analysis.
- Testing, diagnostics, and solving various problems:
- Restarts the headset shell and virtual environment. Contains the following items:
- Restarting the headset shell: Allows you to solve the problem of a dark screen
- Restart the headset shell (second option): Alternative version of the previous paragraph
- Force start of the headset's home environment: Allows you to enter your Home (Virtual) environment in case of a dark screen. Analogous to the Home button on Android devices
- Interactive test of connecting a headset to a PC: Allows you to track in real time when connecting and disconnecting the cable from the PC to the headset.
- Fix the reboot issue using the volume buttons (remove KeyMapper): Deletes the KeyMapper program KeyMapper, which is not normally deleted.
- Embed ADB and the utility package in the system, and remove all this junk from it: Copies multiple files to the system directory for working with adb without having to specify the path to the adb, fastboot, etc. files.
- Executing Fastboot commands. It includes the following commands:
- Fastboot devices: Checking device availability
- Fastboot oem device-info: Collect and save OEM device information
- Fastboot getvar all (bootloader): Collect and save all possible device information in Bootloader mode
- Fastboot getvar all (fastboot): Collect and save all possible device information in Fastboot mode
- Fastboot continue: Continue loading the headset
- Fastboot reboot-fastboot: Reset the headset to Fastboot mode
- Fastboot reboot-recovery: Reload the headset in mode Recovery
- Fastboot reboot-bootloader: Restart your headset in режимBootloader mode
- Restore the screen timeout settings screen timeout): Restores the default settings
- Revoke headset authorization on the current PC (delete ADB keys)
- Cable health check: Test of checking the USB cable from PC to headset with the output of test results for each pass and the data transfer rate on this cable. The number of passes can be set manually.
- Checking whether the cameras are working properly: Searches the headset logs for errors in accessing cameras and outputs the numbers of such cameras.
- Measuring Wi-Fi speed between your headset and PC: ЗапускаетсяThe built-in utility starts Wireless Connect Tester-testing the speed of Wi-Fi. Displays the IP addresses of the headset and PC, and allows you to specify your own IP address for the PC if it is incorrect. You can specify the interval between checks (in milliseconds) and the duration of the check (in seconds). There are two tests - direct and reverse. The results are saved to a text and csvfile, which you can use to build a chart in Excel to visualize the results. After completing the tests, a preliminary simplified analysis of the results is performed. You can perform the analysis at any time if you have csv files.A separate option in the testing menu is responsible for this. There is also a simplified version of testing - Autotest, in which the values are set by default and the test is performed, in fact, with one button.
- Contains the following options:
- Wi-Fi speed auto-test with default values: quick start of testing with predefined parameters: the interval between tests is 100 ms, the duration of each of both tests is 180 seconds, and 1 thread. A more detailed description and instructions for all items in this menu can be found in the program.
- Wi-Fi speed multitest with values from the file. Allows you to run multiple tests in a row with different interval, stream, duration, and bitrate values for each test.
- Standard Wi-Fi speed test with a choice of values: you can set the duration, interval, and number of streams manually.
- Analyze the test results: analysis of drawdowns based on csv files.
- Build a histogram or calculate a trend based on test results: Creating a chart.
- Histogram of reverse validation results (console)
- Histogram of direct verification results (console)
Histogram Illustration of Test Results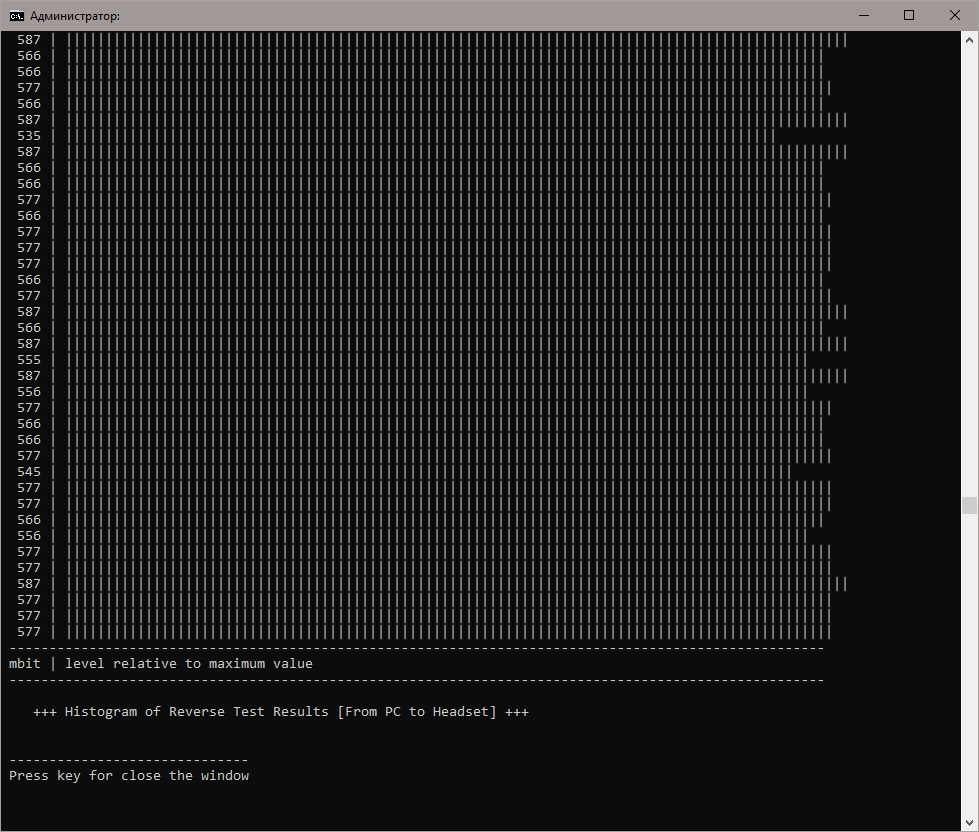
- Graphical diagram of the results of a direct reverse check with a "comb". A chart with a bitrate percentage graph on top of the main bitrate chart. Allows you to visualize drawdown levels more clearly.
- Graphical diagram of the results of a direct reverse check without a "comb"
Grafic Diagram Illustration of Test Results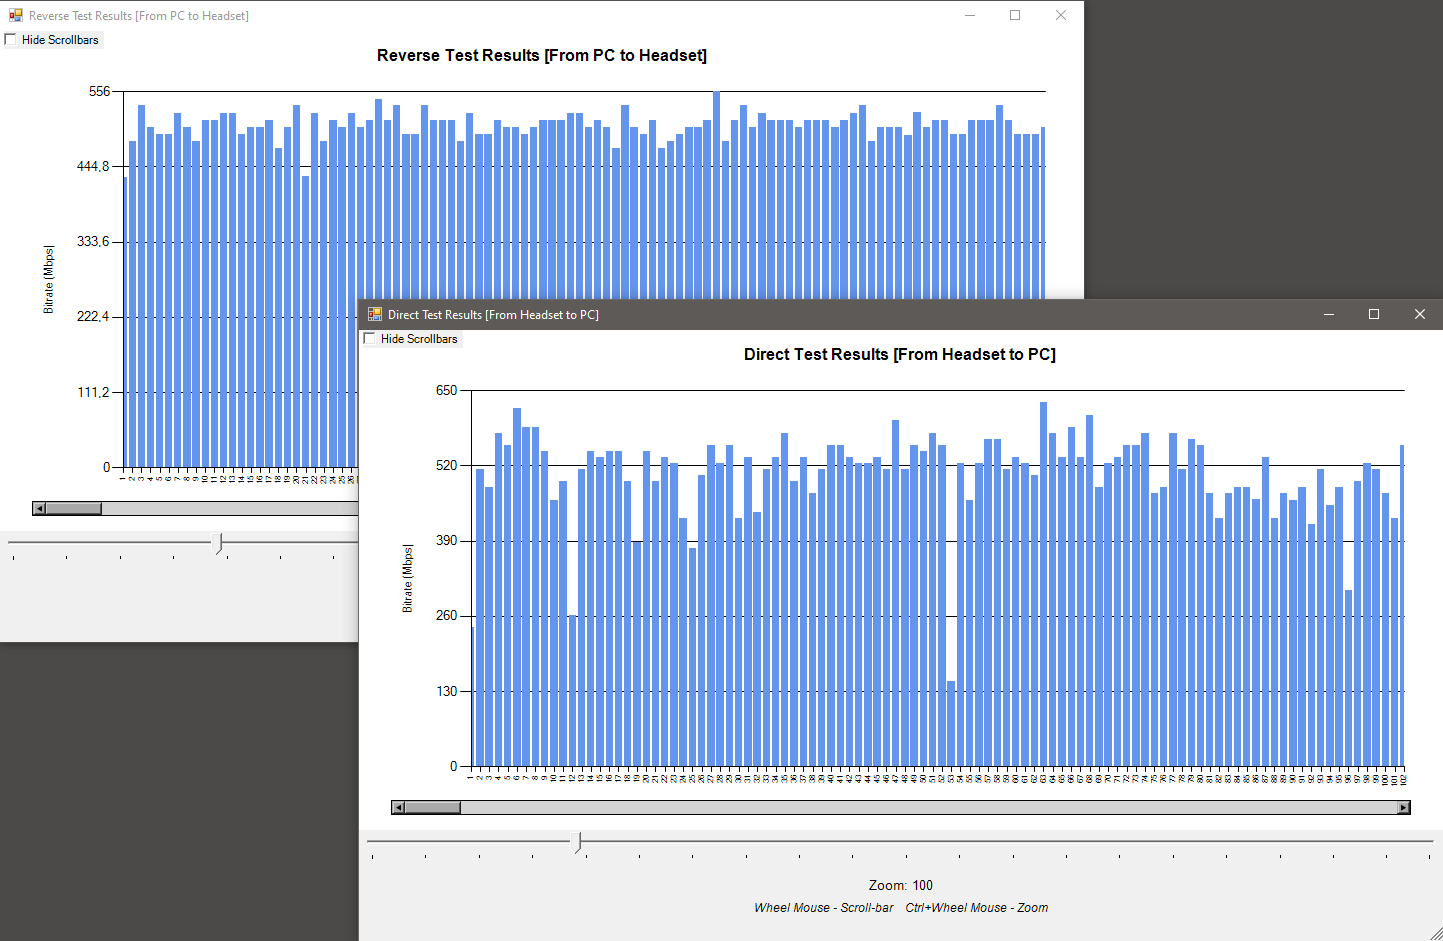
- Calculating the trend based on the results of reverse verification. All test results are analyzed and a tendency to increase or decrease the bitrate during the test is determined. This is probably complete nonsense, but this way there is a chance to determine a decrease in the router's bandwidth, for example, if it overheats.
- Calculation of the trend based on the results of direct verification. Same thing, only for direct verification.
- How to build a chart in Google Spreadsheets (instructions). Instructions on how to quickly and easily build a chart in Google Spreadsheets based on test results.
- Additional explanations about tests, errors, logs, etc.: help with testing options and parameters
- Working with the firewall with the Bad file descriptor error:
- Disable the firewall
- Enable Firewall
- Open port 5201 in the firewall (add a rule)
- Close port 5201 in the firewall (delete the rule)
- Check if port 5201 is closed or open (Windows 10 and higher only)
- Service connection verification: quick connection check, test duration 5 seconds. Only for checking the connection! NOT FOR TESTING!
- Start the iperf server as a separate process: the iperf server starts and waits for the client to connect
- Temporarily install C:\Temp iperf server startup directory iperf: This option is used when the iperf server starts, but the connection is not established due to the lack of necessary access rights. In this case, you can try installing C:\Temp the iperf server startup directory iperf. After that, the server will start not from the user's temporary directory, as usual, but from C:\Temp. The current startup directory will be displayed on the testing page.
- Write a folder C:\Temp go to the registry and make it permanent the same as in the previous paragraph, only the iperf startup directory is not reset after exiting the program.
- Assign a tag (prefix) to the archive name for test results allows you to assign an identifier that will be written to the name of the test archive and saved in the screenshot with the tests.
- Restarts the headset shell and virtual environment. Contains the following items:
Test Results Illustration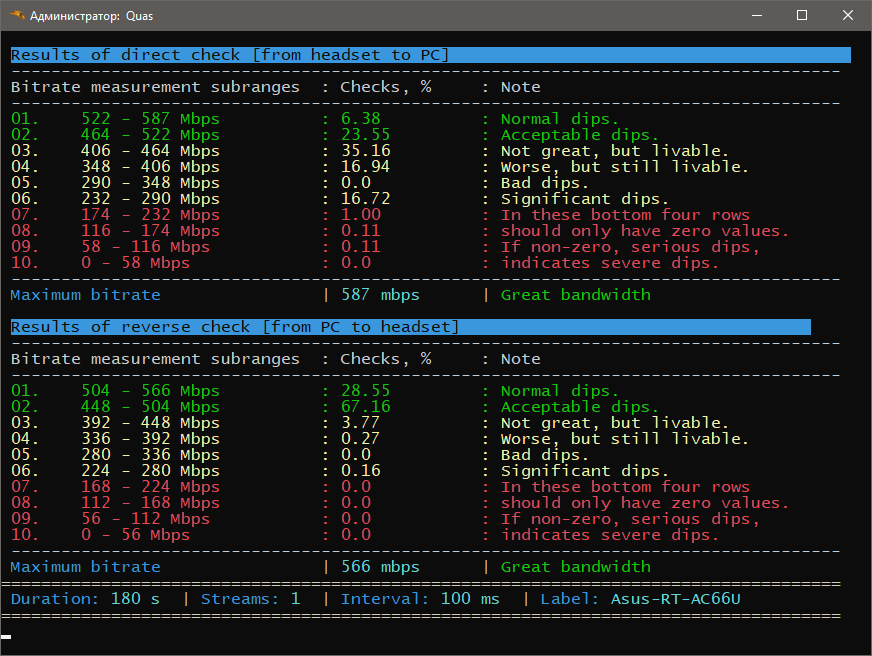 - Network Connection statistics (netstat): Displays full statistics of your headset's network connections. This option lets you know if the headset has access to the Meta servers for firmware updates and the App Library. (see Google-netstat)
- Display Diagnostics: Testing displays, two options.
- Checking the headset loading status: Determines which stage of loading the headset is located or is stuck.
- Load monitoring and component diagnostics: Monitoring the condition and temperature of headset components:
- Fan Status
- PWM fan status
- Fan speed
- Fan Warnings
- CPU Temperature
- GPU Temperature
- Battery temperature
- Case temperature
- USB Cached Temperature
- USB Cached conn temperature
- USB HAL Temperature
- USB temperature HAL conn
- CPU level
- GPU performance level
- CPU Usage
The monitoring interval can be set manually. You can also save the monitoring results to a csv file
- Information about memory usage
- Real-time CPU monitoring.
- Additional options:
- Changing the user name: changes the global user name in native headset games
- Show hidden settings: Display hidden advanced settings in the headset.
- Fixing the OpenSSL SHA Crash Bug: On Intel processors, starting from the 10th generation, there is a bug that causes many games on some versions Unreal of the Unreal Engine to crash or not start. This option fixes the bug.
- Restarting the Oculus service on PC: Sometimes you need to restart all services, and in order not to run through the wilds of Windows settings, you can use this option.
- Open the VPN settings in your headset VPN: For more convenient access to the NVG setup
- Set high priority for Oculus services: Setting an increased priority for Oculus services.
- Comprehensive installation of the Oculus Wireless ADB app: Manage your headset via ADB directly inside the headset itself, without using a PC.
- Managing registry keys for running the app: Saving program launch keys to the registry. There are five keys available for use:
- Bypass Info Table. It allows you to skip the initial check when starting the program and also not display the information table, which will save a significant amount of time for starting the program - about a second and a half.
- Bypass Wireless Warning. Removes the warning window that the headset is connected via Wi-Fi.
- Bypass Initial Status. Disables all initial checks.
- iPerf Temp Dir. Setsthe C folder:\Temp directory for running iPerfon a permanent basis. After that, the iPerf serverwill start only from this directory.
- Backups Dir. Sets the folder for backups.
Keys can be deleted from the registry or re-registered at any time.
- Manage Social Platform apps. Disable and enable social platform apps (People, Horizon World, etc.)
- Solving the problem with fba files: fba files are deleted from the root of the system disk, from the Temp directory in the user profile, and from \Windows\System32. You can also restrict access to the file RemoteDesktopCompanion.exe for the Meta Link program, or set a zero-size stub for this file.
- Enable the screen and disable the proximity sensor
- Deleting old Quas files and Directories Quas: clears all temporary directories and Quas files
- Open the hosts file in Notepad editor: opens the hosts file in Notepad. You need administrator rights to save your changes.
- Find out the pairing code for the mobile app. Allows you (when the headset is connected) to automatically prompt a five-digit code for pairing the headset with the Meta Horizon mobile app
- Creating a shared resource on a PC: Allows you to automate the process of creating a shared directory on a PC, for access from the headset to this network resource. The connection to this resource is made as to a regular network drive (see Google)
- Disabling and enabling driver signature verification allows you to install the driver without a digital signature.
- Deleting a graphic key will help you clear the graphic key on your headset if it is forgotten or doesn't fit.
- Headset firmware and firmware information:
- Fully automatic firmware: The headset firmware is fully automated, just put a firmware file with any name next to the program, select this mode and confirm the start of the firmware. Then the whole process will proceed automatically and will be accompanied by explanations for each operation. This option requires Developer Mode to work.
- Push-button automatic firmware: A semi-automatic version of the firmware. Everything is the same as in the previous paragraph, but before flashing, you should load the headset in Bootloader mode. Developer mode is not required.
- Extract firmware link and download firmware files: Extracts links (if there are several of them) to firmware from the headset, saves them to a text file, and downloads the firmware itself.
- Only extract a link to the firmware from the headset: Extracts links (if there are several of them) to the firmware from the headset and saves them to a text file.
- Download different firmware versions: A browser opens with the site address where you can get the latest firmware versions
- Show the current headset firmware version and check if it's up to date: Displays the current firmware version of the headset and displays a message if this version is not up-to-date.
- Firmware Analyzer: checking the firmware file for correctness and compatibility. Allows you to find out all the information about the firmware file: full or incremental. In the latter case, it will tell you the firmware version that the increment is intended for. Displays the environment version, firmware, and headset model, and checks the file for integrity and compatibility with the current headset firmware version. As a result, it gives a summary of whether this file will be flashed. Your computer must have internet access to complete the analysis. Otherwise, the information will be limited to the firmware version only.
- Download tables of how environment versions correspond to headset firmware versions: a table is downloaded for the selected headset model with the environment version number and the corresponding headset firmware version number.
- Additional explanations about incremental firmware updates
Result of the Firmware Analyzer: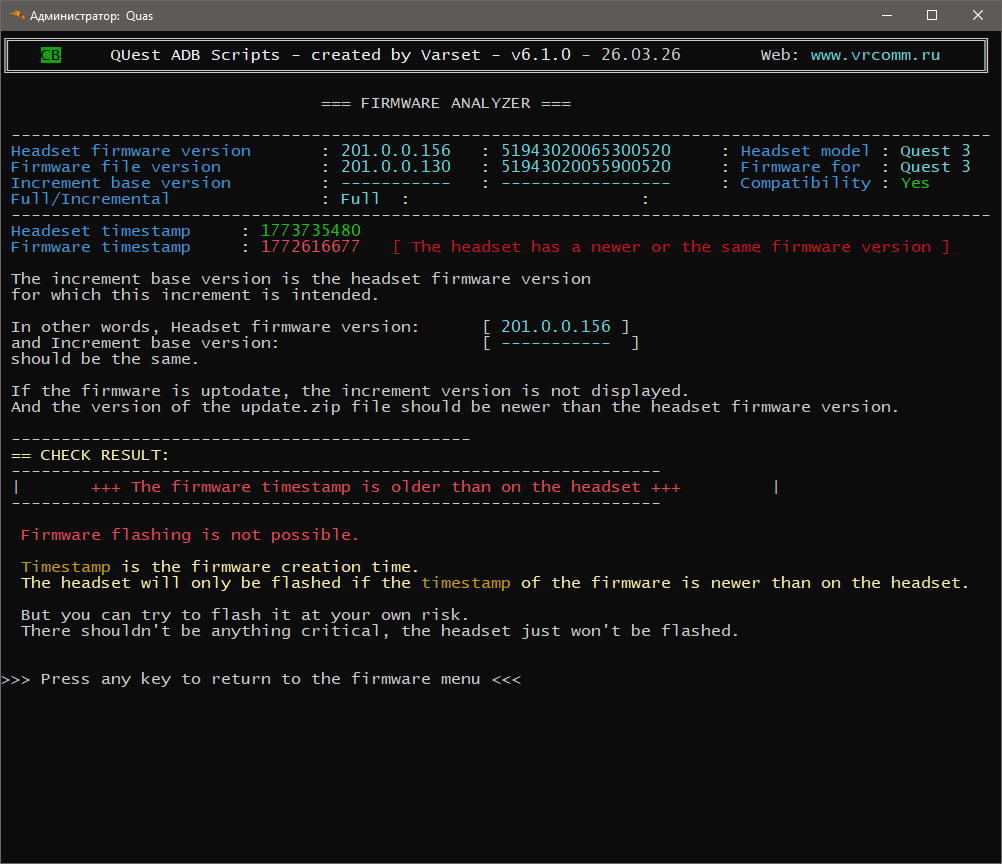
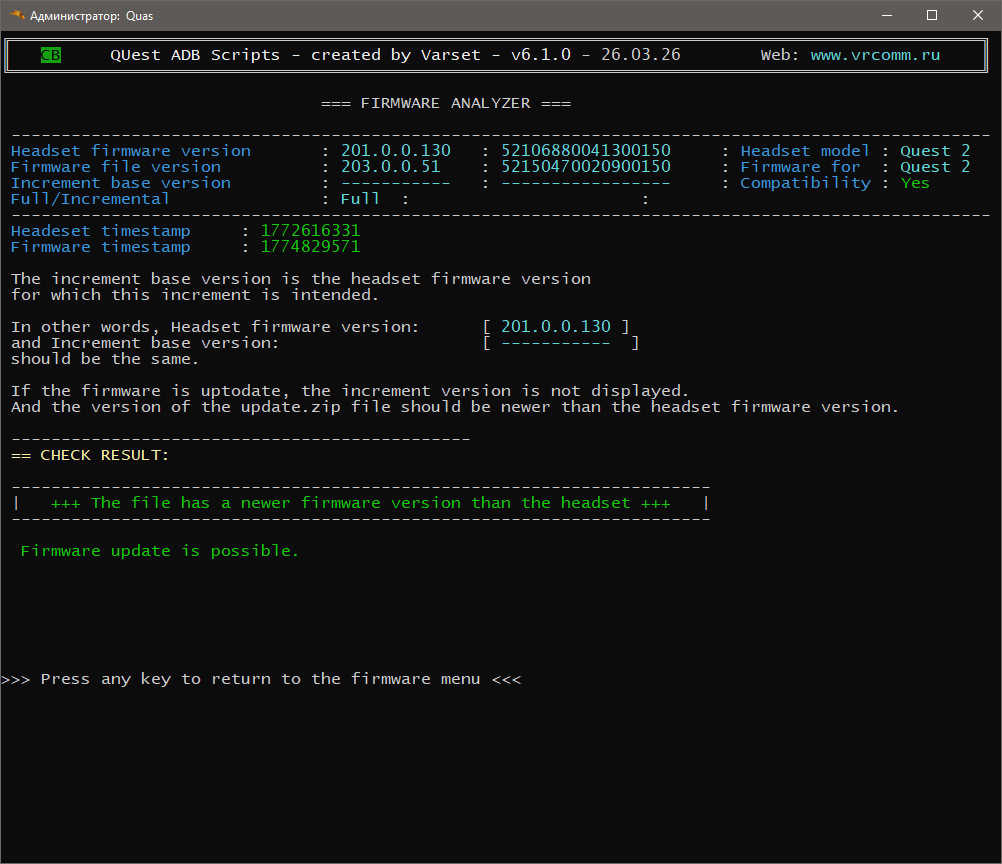
Firmware update check result: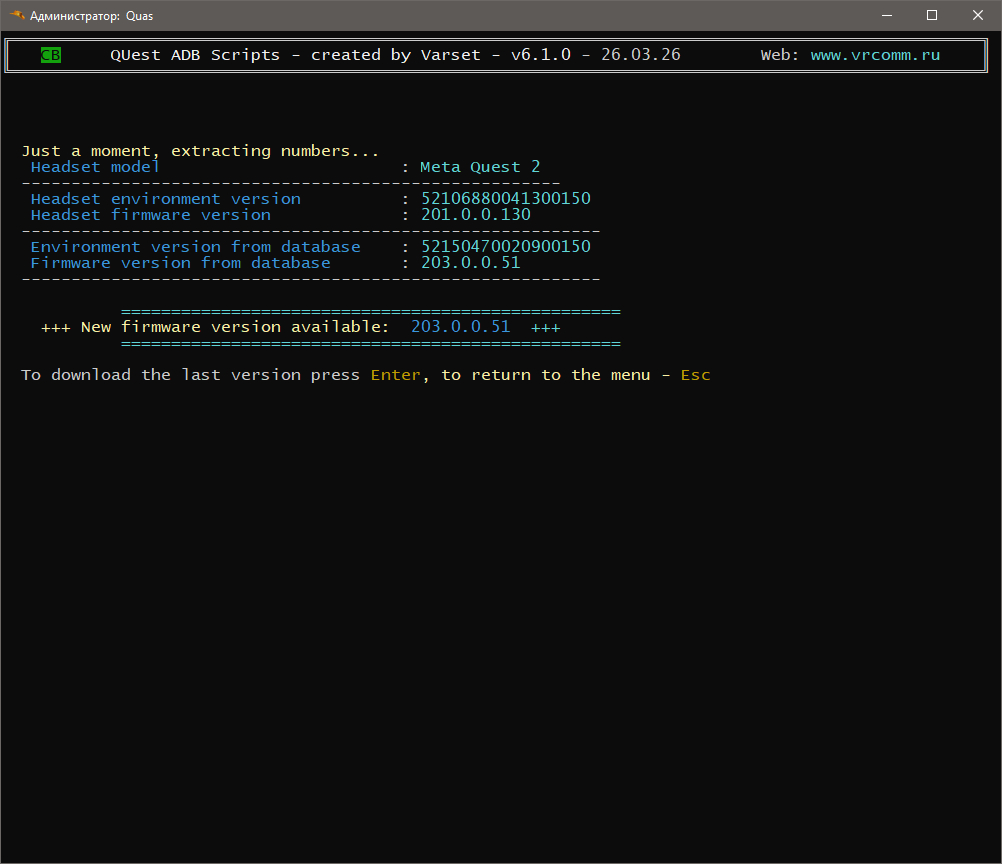
Automatic Firmware Menu: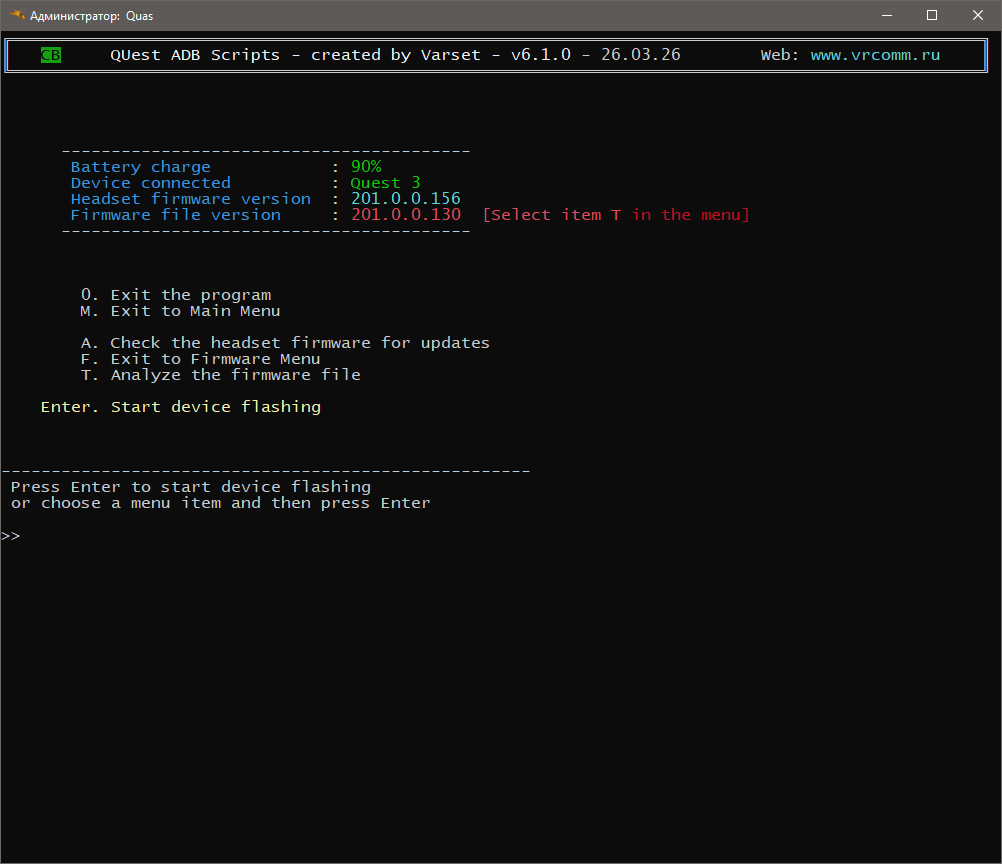

- Download/update progress, DNS installation: Includes the following options:
- View the download progress: Displays the progress status as a percentage. The status can be updated either manually or automatically, with a specified check interval.
- Recording DNS servers in the headset: Alternately registers DNS servers from the list in the headset. There are 97DNS servers in the list, and each new one is registered after clicking the button.
- Automatic DNS selection for downloading updates: Automatic search of DNS servers. The program registers DNS servers from the list in the headset, checking the availability of update addresses after each server, and if the update address is unavailable, automatically registers the next DNS server from the list and so on until the address becomes available or the list ends.
- Resetting the headset's DNS settings to default: Sets the default DNS server settings.
- Completely disable the frequent DNS server
- Install a DNS Internet stub: Sets the DNS server address to 127.0.0.1
- Checking the availability of updates on your PC: Automatic checks the address of Meta server updates on the PC and displays a message about the result, whether it is available or not.
- Checking the availability of updates on your headset: Automatic checks the address of Meta server updates on the headset and displays a message about the result, whether it is available or not.
- Find out the status of the current DNS server and its address: displays the address of the DNS server currently registered on the headset.
- Working with apps:
- Launch the Quest Install Director app installation utility Director: comprehensive utility for installing applications both singly and in batches-files and directories
- Launch apps on your headset: launching some apps: Customers ' NVR, etc.
- Learn the command to launch the app on your headset: allows you to find out the name of the application, the name of its package, and the command to run these applications from the PC on the headset via adb.
- Display and save the list of installed apps: displays a list of installed applications, with names or only with package names. App List Categories:
- All
- System requirements
- Unofficial ones
- Disabled users
- Enabled ones
- Filtered by app name or part of the app name
- Manage selected apps: Manage apps from the selected category. Displays a list of selected apps and allows you to do the following:
- Deleting an app from your headset
- Soft delete(without clearing data or cache)
- Clearing data and Cache
- Disabling it
- Enabling it
- Launch
- Stop
- Restart
- View the app status:
- Installed/Not installed
- Hidden content/Visible content
- Suspended/Working condition
- What is being launched/Not triggered
- Enabled/Disabled
- Instant message/Not instantaneous
- Virtual/Physical Location
- View applications running on your headset. To view applications that are currently running, select this option, and in the next menu, select option1.Then, in the list of apps, click Select All and Confirm. After that, a list of running applications will be generated and displayed on the screen (as well as in a file).
- Save a list of selected apps to a file
- Installing VPN clients for Android: installs Oculus clients andPC driversfor Win7 and Win10 on the NVR headset. The driver version is selected automatically, depending on the operating system. List of NVG clients to install:
- Ultrasurf
- Windscribe
- OpenVPN Connect
- OutlineVPN
- AdGuard VPN
- Shadowsocks
- Psiphon VPN
- Proton VPN
- Free VPN Planet
- ByeByeDPI
- v2rayNG VPN
- v2rayTun VPN
- Wireguard
- Kakadu VPN
- Happ Proxy
- Samsung MAX
- Amnesia
- X-vpn
- Mullvad VPN
- Hidemyname VPN
- VPNLY
- SurfShark
- Installing VPN clients for PC
- Windscribe
- OutlineVPN
- AdGuard VPN
- Shadowsocks
- Psiphon VPN
- Free VPN Planet
- v2rayTun VPN
- Wireguard
- Kakadu VPN
- Happ Proxy
- Amnesia
- X-vpn
- Mullvad VPN
- IVPN
- Hidemyname VPN
- VPNLY
- ClearVPN
- SurfSharl
- Installing media apps: Install mediaplayers, online movie theaters, and a torrent client for online viewing. List of installed apps:
- Skybox VR Video Player
- Moon VR Video Player
- 4XVR Video Player
- Pigasus VR Video Player
- HereSphere VR Video Player
- VLC Media Player
- TorServe
- Filmix UHD (Online Cinema)
- Cinema HD (Online Cinema)
- Cast Reciever
- Installing application applications: installs several application programs: file managers, browser, launchers, etc. List of installed apps in this category:
- VRComm mobile client: A mobile client for accessing the site vrcomm.ru
- LightningLauncher: An app launcher with extensive features for the headset
- File Manager+: A convenient file manager for your headset
- XR File Manager: The headset's file manager, a replacement for the built-in Files, but with the ability to write to the Android/data directory
- Bugjaeger Premium: A service program for managing the headset via ADB from inside the headset.
- Termux: A service program for Linux console commands
- Oculus Wireless ADB: A program for accessing the headset via wireless ADB
- RCX: A program for downloading unofficial content directly on your headset.
- TotalCommander: A two-panel file manager for the headset
- SH Script Runner: Creating and running scripts on the headset
- ADB GUI Tool: Working with ADB on the headset
- OVR Metrics Tool: A headset diagnostic program from Meta
- Internet Speed Meter: Testing your headset's internet speed
- Script Manager: Creating and running scripts on the headset
- Passthrough cam tool: Program for enabling end-to-end camera mode even when the Security zone is disabled.
- App Cloner: A program for cloning applications
- Apk Tool M: A multifunctional program for working with applications: translating, recompiling, editing the name and title of the application, etc.
- MPatcher: A program for cloning applications
- Private Quest (only for smartphones): Service program for accessing the headset and enabling Developer Mode.
- Steam Link: A Steam client for connecting your headset wirelessly to your PC
- Auto Start Apps Manager: Manage application autostart
- XR Native File Manager: allows you to access the Android/data and Android/obb directories from the headset obb
- Installing game apps: A category of programs for downloading games or apps, or for setting unofficial status for games and apps. List of applications:
- qLoader
- Rookie Sideloader
- ARMGDDN Browser
- VRP Essentials
- YAAS
- Steam Auto Crack
- Steam Auto Crack GUI
- Quest Patcher for Beat Saber
- APPID
Quick instructions on how to use each app are also available.
- Installing ADB Utilities contains a list of utilities for working with ADB. Here is a list of them:
- Embed the ADB package in the system and also remove all this junk from it
- Bugjaeger Premium
- Termux
- Oculus Wireless ADB
- SH Script Runner
- ADB GUI Tool
- Script Manager
- Meta Quest Developer Hub
- Cleaning up unnecessary apps makes it possible to clean the headset a little from various junk. Options in this menu:
- Disablingе unnecessary apps
- Removing unnecessary apps
- Export application lists to files from the registry
- Import application lists from files to the registry (with adding entries to the registry)
- Import application lists from files to the registry (with clearing registry entries)
- Deleting lists from the registry
- Open the HKCU\SOFTWARE\Quas\registry branch
- Create text files with app lists
- Select and add to the list of apps to delete
- Select and add to the list of apps to disable
- Setting CPU/GPU/Refresh Rate/Resolution/frameSync
- Oculus Link/Airlink Management: List of options in this category:
- Launch Oculus Link
- Disable Oculus Link
- Enable AirLink
- Disable AirLink
- Fix the Airlink connection issue: Deletes the Airlink pairing settings on the PC
- Make a backup of Airlink connection parameters: An archive of registry settings and Airlink pairing files is created on the PC
- Clear leftovers from your PC after removing Oculus Software: Removes all trash left on your PC after removing Meta Quest Link
- Calculate Dynamic Bitrate values for Oculus Debug Tool: Calculates Dynamic Offset Dynamic Max values for the desired maximum and minimum dynamic bitrate
- Reset Oculus Debug Tools to default settings
- Download and run the Oculus Installer VIA Meta Quest Link: Downloadable OculusSetup.exe and it starts.
- Fix the Meta Link connection error
- Find and show errors in Meta Link installation logs
- Create shortcuts for copying files and installing apps: Launches the Quest Context Tool subroutine, which allows you to set shortcuts for copying and installing applications in the Send context menu. After that, just right - click on the file and install it on the headset, or copy it to any of the headset's directories-Movies, Download, OBB, or root:
Illustration of working with contextual shortcuts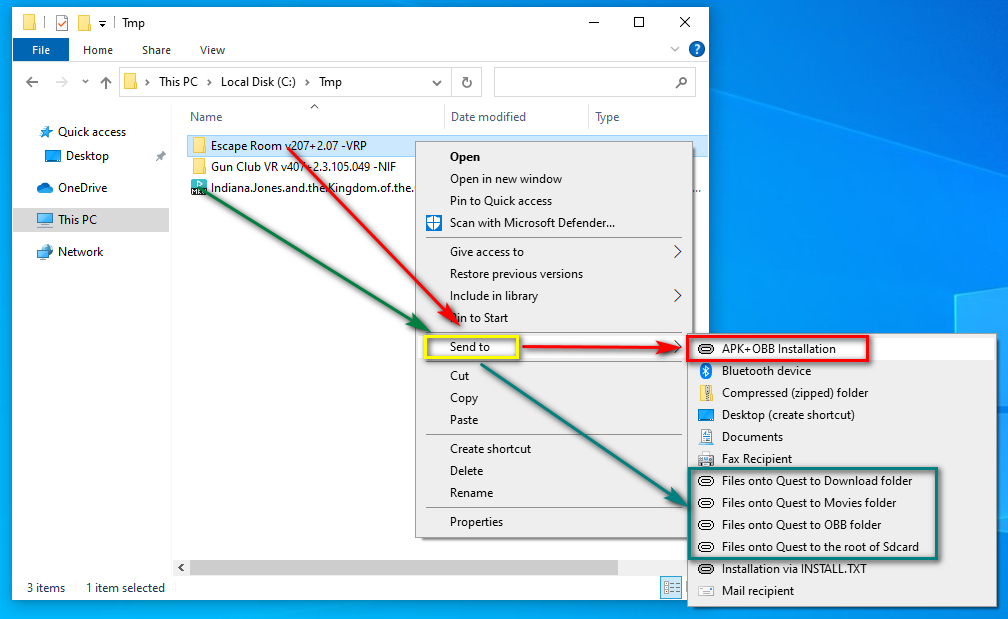
Quest Context Tool can install applications using the script install.txt, which is usually located in the game directory, and the standard installation isapk and obb. Batch installation is also available . If you click on the games folder with the PCM, all of them will be installed in turn. When installing or copying,you will see a detailed and clear installation or copy log. When the installation is complete, it displays a list of installed and uninstalled applications. Saves the names of unknown files to a file. It contains a built-in user guide. Options in this menu:
- Files on Quest in OBB: copies files and directories to Android/obb
- Files on Quest in Data: copies files and directories to Android/data
- Files on Quest in Movies: copies files and directories to Sdcard/Movies
- Files on Quest in Download: copies files and directories to Sdcard/Download
- Files on Quest in the Sdcard root: copies files and directories to the Sdcard
- Installing the APK+OBB: Installs apps. Batch installation is supported, and you can select a folder with several applications that will be installed in turn.
- Restore the archive .ab: Restore files from a backup to your headset
- Installing via INSTALL.TXT: Installation according to the script install.txt in the folder with the app
- Set all shortcuts at once: Sets all shortcuts at once
- Program Description (help)
- Delete installed shortcuts and Files: Delete all installed shortcuts
- Manually delete installed shortcuts and files: If the shortcuts are not removed for some reason, you can do it manually
- Adjusting the date, time, and timezone in your headset: the function checks whether the set time, date, and timezone are correct and sets the correct values if necessary.
- Backup and restore: creates and restores app data, and saves apk and obb files. Contains sub-items:
- Application Archiving menu:
- Data archiving by choice
- Archiving data by list
- Archiving data for all applications
- Archiving only apps with data
- Description of the functions of this menu
- Application Data Recovery Menu
- Standard recovery (thorough scanning of backups)
- Standard recovery (instant scan of backups)
- Restore with manual backup directory selection
- Recovery with manual backup file selection
- Application data recovery (old algorithm)
- Description of the functions of this menu
- Save app Files menu
- Save all app files (APK+OBB+DATA)
- Saving an APK
- Saving APK+OBB
- Saving data
- Description of the functions of this menu
- Show and create a list of apps
- Extracting data from a backup file
- Remove the ban on access to save files
- Set a permanent folder for backups
- Enable proximity sensor
- Copy or move selected archives to a separate subdirectory
This section is used for archiving and restoring app data that stores game saves, settings, and other information about the app. Here you can back up this data for each app and then restore it, for example, after resetting your headset to factory settings. This way, your saves and settings won't get lost. If the data files do not contain saves or they are located in a different location, the backup will not save them.
- Stream a video broadcast on your PC: It runs on the scrcpy program scrcpy and contains five broadcast modes from the headset to the PC - four preset and one manual. Manual mode can be configured independently by seven parameters: Bitrate, FPS, file recording, audio output, proximity sensor, and video codec. The subroutine can work with preset profiles and contains six integrated profiles: minimal, light, balanced, demo, high - quality, and maximum. You can select any of these profiles and immediately start broadcasting with them. You can also set up your own profiles - up to four of them. They will be written to a separate file and can be loaded in the same way as integrated files. In addition, in manual mode, you can save the scrcpy startup string and edit it as you see fit. It contains built-in instructions for use.
This also includes another program for broadcasting – Casting, which is a separate independent translation module extracted from the Meta Quest Developer Hub program. It broadcasts the image in full-format mode and has many settings – bitrate, resolution, etc. Includes the ability to record videos and create screenshots (images).
- List of advanced commands and parameters(Help): Restart on behalf of the user, restart from the admin with a UAC request, restart from the admin without a UAC request, accelerated start of Quas- without a table and checks, additional explanation about incremental firmware, enable installation with the ability to downgrade, enable display of installation details, enable recording in the installation log file, headset partition table and their size in bytes and gigabytes: These Additional Keys and Commands are:
Command line Options:
h = This window (can be typed in the Main Menu)
u = Restart as a user
c = Restart from admin with UAC request
a = Restart from admin without UAC request
b = Quick start of Quas: without tables and checks
v = Verbose: displays complete information about the script operation
f = Quas start with pre-closing of processes adb.exe
qqX = Automatic archiving of application data by the list with the number "X"
d = Collecting and sending diagnostic information
Hidden commands in the Main Menu:
00 = Restart Quas (works in any menu)
G-FF = Additional explanation about incremental firmware updates
J-A-d = Enable installation with downgrade option
J-A-v = Enable display of installation details
J-A-l = Enable writing to the installation log file
J-E-dd = Disabling apps in batch mode
J-E-gg = Stopping applications in batch mode
449 = Headset partition table and its size in bytes and gigabytes
103 = Headset partition table and its size in bytes and gigabytes
77 = Connecting the headset via ADB-TLS (similar to points F-G-D)
pt = Display Wi-Fi test results from the Diagnostics menu or from the Main menu
qqXX = Quick backup from the list with the number XX
s = Debugging information
st = Quas Console Window
adbe = Quickly embed the ADB utility in your system
adbd = Quickly remove the ADB package from the system
adbi = Quickly embed a package of utilities and ADB in your system
- Search by menu options. You can search by the names of all options and menus in the Quas program. The program can search by part of a word, the search is case-insensitive. To save the full list of all options in a tree view to a file, simply press Enter in the input line.
Illustration of search results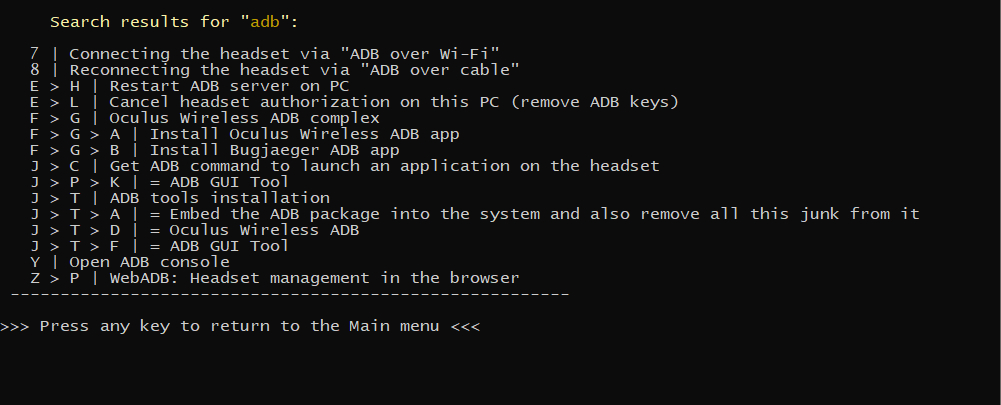
- Contact with the author: links to Github, Viarcomm, link to the program description and donat via browser or QR code.
- Open ADB File Manager: opens the File Manager to copy files from the headset to the PC and vice versa.
ADB File Manager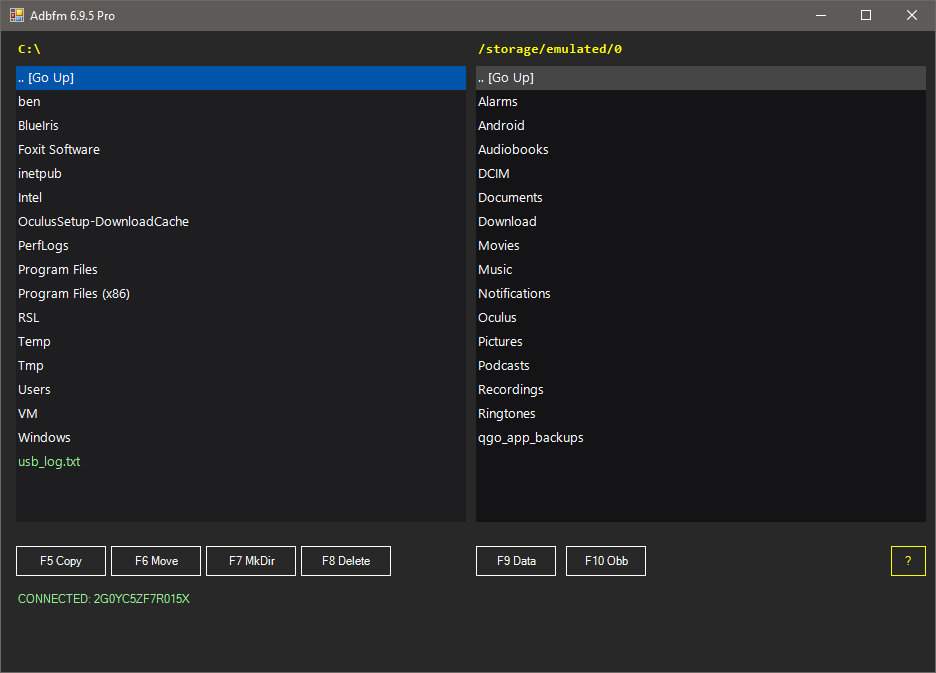
- Open the graphical console: opens a command console window. Console illustration and features:
Quas GUI Shell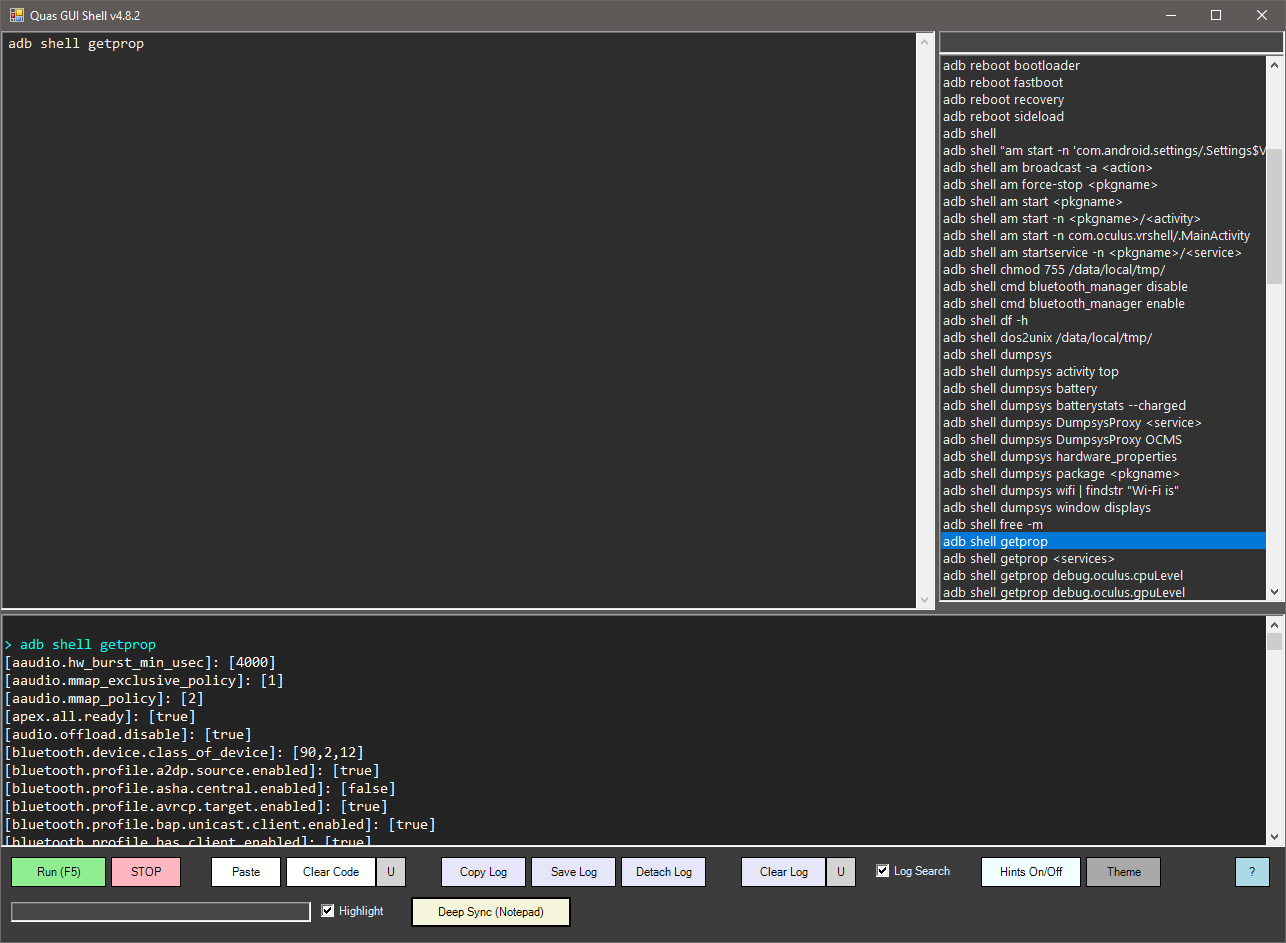
- Run any CLI commands from the GUI, such as adb devices
- Support for interactive commands (cmd, powershell, fastboot, adb shell, etc.) - they open in a separate window corresponding to their shell
- Batch execution support (many commands at once)
- Context Menu-copy, paste, select
- Run for execution with the interface button or F5 key
- Saving the results log to a file
- Coloring results in the program window
- Help with problem solving: opens sites in the browser where you can get help or read instructions on how to solve certain problems
- The program has a Diagnostic Mode. Log in to it after renaming quas.. in dquas..., that is, to have the letter d at the beginning of the file named. List of options in this mode:
- Restart to normal mode
- Restart with removal of processes adb.exe
- Running with checks disabled and without ADB
- Embed ADB in the system
- Install Meta Drivers
- Collect and send diagnostic information
- Automatically free up space on your headset
- Running Quas in Debug mode
Headset not found Illustration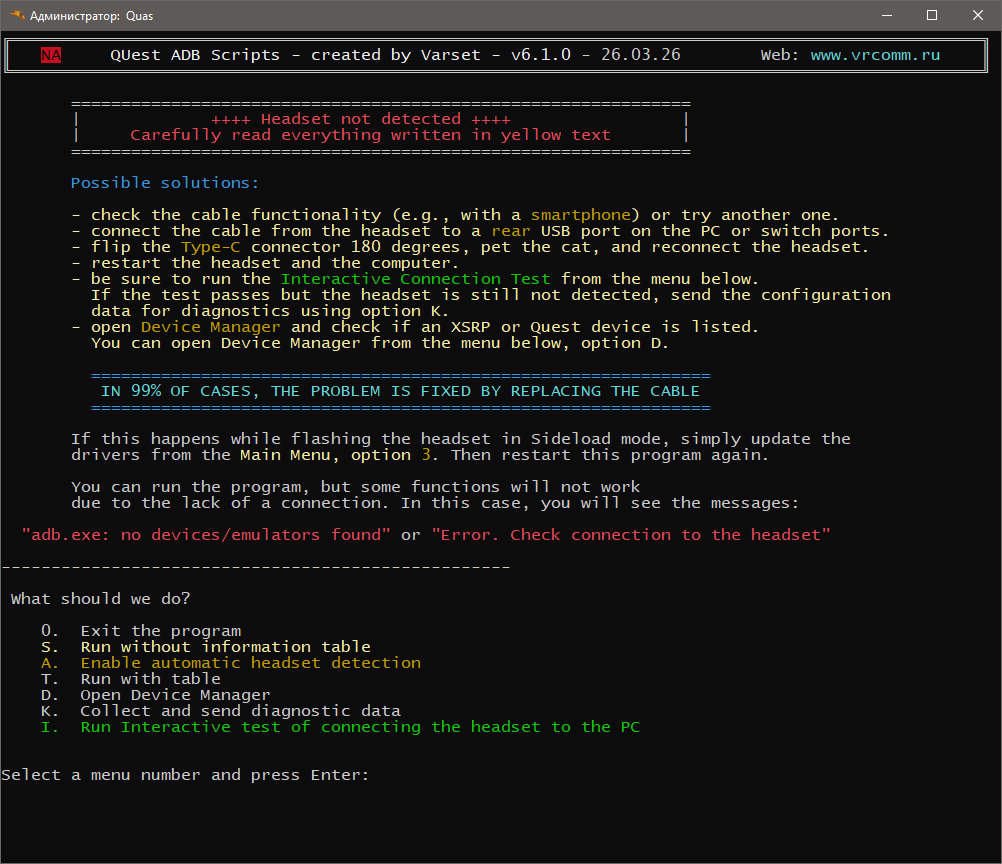
FAQ for the Quas app:
Q: My antivirus software claims that there is a Trojan or virus in the program. Why?
A: The program and additional utilities are packaged in a single package using the Quick Batch File Compiler application, which, unfortunately, is often used for packaging malicious applications. As a result, anti-virus programs that detect a familiar packer signature do not bother checking the contents and immediately mark the package as malicious. You can unpack the package Quas the usual7zip archiver and study its contents, or you can go to GitHub and see the package composition and source code. Also, starting withv3. 1. 0, the package includes Quas included app AndroidMdnsDiscover.exe designed for detecting the headset over the mDNS protocol and displaying the headset's IP address and port. The same functionality is provided by the Python script, which you can view and download here: https://github.com/thedroidgeek/oculus-wireless-adb/tree/main/script. The packer of this program is also not liked by antivirus programs.
Q: What is the difference between connecting a headset via Wi-Fi from the main menu (item 7) and connecting a headset via port 5555, items F-G-C?
A: If we are talking about connecting to a PC, then there is no difference in this case. However, the second option can also be used to connect directly to the headset from the headset itself, using the same port 5555. You can control the headset via ADB from the inside using apps like Termux or Bugjaeger. For example, you can change the resolution, refresh rate, or CPU/GPU level in this way. Similarly, you can easily connect the headset to a PC wirelessly on the so-called random port, if the Quest Games Optimizer program is running and running on the headset Quest Games Optimizer.
Q: Why is the program written in cmd?
A: Because I do not know other languages, and I just needed a utility with a small set of ADB functions, so that I did not have to enter commands manually every time. I wrote it and decided to share it. But over time, the program has grown a little..
Q: I found an error, what should I do?
A: Write about it right here on the forum in the topic Discussion of the Quas app or directly from the program, points W-F-Leave a review or send a file. I'll try to fix it for the next release.
B: Headset in Bootloader mode. I connect it with a cable to the PC, run Quas and it writes that the headset is not detected. The drivers are installed.
A: Install more recent versions of drivers, while the best ones are1.72. You can download them in the Downloads section of this forum.
B: At startup, the following messages appear: "mode"is not an internal or external command, executable program, or batch file, and"chcp" is not an internal or external command, executable program, or batch file.
A: Most likely, you are missing some mandatory elements of the system PATH variable, namely: C:\Windows, C:\Windows\System32.
To fix this error, add these missing parameters to the PATH variable.
Open the cmd console with administrator rights and run this command there:setx PATH "%PATH%;%SystemRoot%;%SystemRoot%\System32"
Then restart your computer and check again.
B: I flashed the headset with your program and now it won't load. Is it because of the manual firmware or is the program to blame?
A: Neither. Unfortunately, this happens, and it doesn't matter how to flash it - officially over the air or manually. In fact, the program does not flash, it only loads the firmware file into the headset using the standard Android mechanism.: adb sideload update.zip. But after тогоthe firmware file is sent to the device, the headset itself is directly involved in installing the firmware, before double-checking the file for certificates and correct checksums. This is also the reason why it is impossible to flash a modified or inappropriate firmware file - the headset simply won't "approve" it and won't sew it. It also checks whether the file version matches the headset version.
You can also read this article: What is the difference between over-the-air (OTA) headset firmware, manually, and via the Meta website?
B: I start the program and get a lot of messages" The system cannot write to the specified device".
A: This is due to console Cyrillic fonts, not all of them support Cyrillic characters in UTF-8. Open the cmd console and click RMBon the console window icon in the upper-left corner. Select "Default" and on the Fonts tab, set the Lucida Console or Consolas font. Or use the English version of Quas, there is no such problem.
Download
Click download now to get access to the following files:
Development log
- What's new in version 6.1.089 days ago
- What's new in version 6.0.0Jan 19, 2026
- What's new in version 5.2.0Oct 02, 2025
- What's new in version 5.1.0Aug 09, 2025
- What's new in version 5.0.0Jun 24, 2025
- What's new in version 4.3.3May 27, 2025
- What's new in version 4.3.2May 25, 2025
- What's new in version 4.3.1May 23, 2025